Save an hour of work a day with these 5 advanced Excel tricks
Work smarter, not harder. Sign up for our 5-day mini-course to receive must-learn lessons on getting Excel to do your work for you.
How to create beautiful table formatting instantly...
Why to rethink the way you do VLOOKUPs...
Plus, we'll reveal why you shouldn't use PivotTables and what to use instead...
Using IF statements in Excel
Conditional statements using the IF function are one of Excel's most powerful tools. In short, IF uses logic to determine what action to take based on conditions that you outline in your spreadsheet. It works off of basic boolean logic using the TRUE and FALSE functions; you can also combine it with AND, OR, and NOT statements for extremely powerful logic chains.
If you aren't yet familiar with the TRUE and FALSE functions, be sure to read our TRUE and FALSE tutorial before proceeding. It will also be helpful to be familiar with logical operators and AND and OR functions before proceeding — but it's not required.
To give you some inspiration on how the IF function might be used, consider the following examples. IF can allow you to:
Modify the Price column of a product based on the name of that product;
Tag a Customer type column based on a particular customer's name;
Perform one action if the City of a user's hometown is set to "San Francisco", and an entirely different action if it is set to "Boston";
And lots more!
Read on to find out how to use this powerful tool.
If the logical_expression provided to the function evaluates as TRUE, then the formula as a whole will output the value you specify in the value_if_true field. If, on the other hand, the logical_expression evaluates to FALSE, the formula will output the value you specify in the value_if_false field.
Let's take a look at an actual IF statement in its most basic form:
=IF(TRUE, 1, 0)
Output: 1
=IF(FALSE, 1, 0)
Output: 0
In the first example above, the formula outputs the value 1, because the logical_expression argument is set to TRUE and the value_if_true argument is set to 1.
In the second example, the formula outputs the value 0, because the logical_expression argument is set to FALSE and the value_if_false argument is set to 0.
Of course, the IF statement isn't particularly useful if you provide it with a simple logical_expression like TRUE or FALSE. Let's take a look at a slightly more useful version of the equation:
In the above example, Excel first evaluates the logical expression 7<3 — which, of course, evalutes to FALSE. It then looks in the value_if_false field and sees the phrase "Incorrect answer", which it uses as the output of the formula.
Referencing foreign cells
Static logical equations are just the beginning of the power of the IF statement. Let's say we're dealing with a more complex situation, in which we want to output a particular message based on whether sales representatives met a particular quota this quarter. We calculate whether the quota was met by summing sales numbers from the Monthly sales column of a data table:
Can we design a formula that will dynamically output a message based on whether these sales goals were met?
First, we'll need to add an input cell that tells us what the sales goal for this quarter is. Then, we'll design a separate set of input cells that tell us what message to give our sales representatives based on their quarterly numbers.
In the above formula, we first tell Excel to take the SUM of cells C3:C5, and compare that number to the value in cell F2. If the SUM of C3:C5 is greater than or equal to F2, we tell the formula to output the value in cell F3, which is a message telling our sales representatives, Good job!. If, on the other hand, the sales quota was not met, we tell Excel to output the value in cell F4, which tells out sales reps, Better luck next time.. In this case, our total sales, $22,000,000, is greater than our quota, $20,000,000 — so our representatives are rewarded with the Great job! message.
Nested IF functions
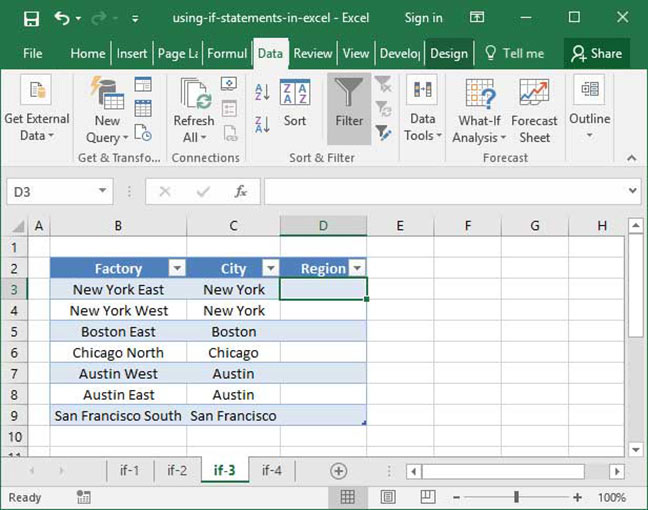
To take things one step further, we can also nest IF functions within one another for complex chains of logical statements. Take, for example, the following table, which lists SnackWorld factory locations by city:
Let's say we want to add a column that groups these cities by region. Anything in Boston or New York should fall into the "Northeast" region; anything in Chicago should fall into the "Midwest" region; and anything else should fall into the "Other" region. Let's design a nested IF statement to help us accomplish this goal.
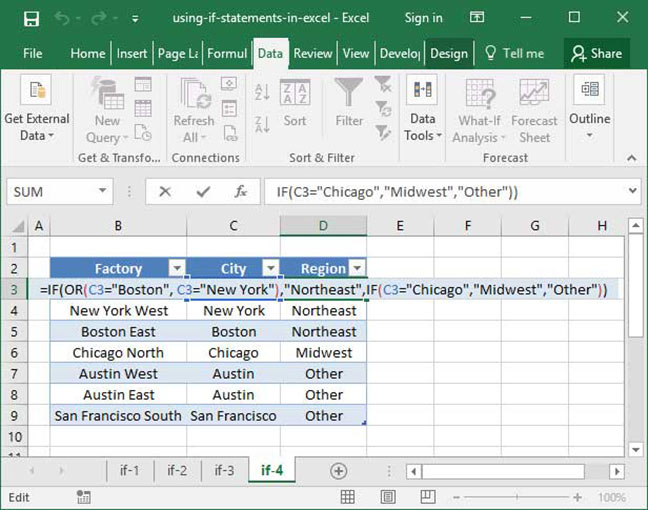
What's going on in the above equation? First, Excel checks to see if the value in cell C3 is equal to either "Boston" or "New York". If it is, the formula outputs the string value "Northeast". If not, Excel moves on to the output_if_false section of the equation, which contains another IF statement: if the value in cell C3 is "Chicago", the formula outputs the value, "Midwest". Otherwise, it outputs "Other".
Notice that we've used the same formula for every row in this table. We can do that because we haven't locked the row number, so as we copy the formula down into additional cells, the row number changes to accommodate. The formula in cell D4 references cell C4; the formula in cell D5 references cell C5, etc.
Now that you have a handle on the basics of the IF statement, try to come up with some examples of how you might use it in your own spreadsheets. There are myriad potential uses for this amazing function, so save yourself some time by integrating it into your sheets rather than performing logical calculations manually!
Once you're comfortable with IF statements, move on to our SUMIF tutorial, which will show you how to sum up values in a particular column based on conditional, logical expressions.
Save an hour of work a day with these 5 advanced Excel tricks
Work smarter, not harder. Sign up for our 5-day mini-course to receive must-learn lessons on getting Excel to do your work for you.
How to create beautiful table formatting instantly...
Why to rethink the way you do VLOOKUPs...
Plus, we'll reveal why you shouldn't use PivotTables and what to use instead...